997.2 Secondary Air Instructions
FIRST FAMILIARIZE YOURSELF WITH THE LOCATION OF THE VACUUM LINES AND ROUTING
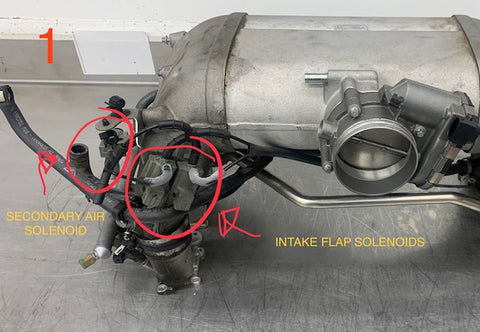
***PICTURES 1-5 SHOW LOCATIONS AND OEM ROUTINGS
***PICTURES 6-7 SHOW HARDLINE ROUTING
The 9972 GT3/RS uses a single vacuum operated shutoff valve. This system is converted to a DUAL valve setup using 997.1 parts.


-Remove the hard crossover pipe. There are 2 bolts on B4-6, while B1-3 has a large compression fitting that requires a 24mm wrench to loosen. Once loose, slide the hard pipe out of the engine.
-Remove the soft hose that runs from the Sec Air pump to the valve.
-Remove the (2) 5mm hex socket bolts and remove the valve/console assembly
-Remove the Valve from the console stand and set aside as you will need to reuse the Air Valve.
The new parts use 997.1 Sec Air console manifolds.
-Install used air valve to new console stand with new gasket, and install NEW air valve to new console stand with gasket as shown in pictures.
****with the O ring groove side of the Console manifold sitting on a table, the air valve outlet should be pointing towards the table, down, not upwards when installed correctly.
SEE PICTURES 8-9


Remove the Vacuum lines and solenoid valves from the upper intake manifold assembly
-Remove the Large flap vacuum line from the solenoid and from the cover.
-Remove Vacuum Elbow from the Sec air line where it used to attach to the original Shut off valve.
-Install supplied 3 way vacuum TEE, one end to SEC air SUPPLY line, one to the B1-3 shut off valve vacuum port.
-Remove one elbow from the Large flap vacuum line, and install that end into the last open port of the 3 way vacuum TEE.
-Connect the other end of the Large flap vacuum line to the B4-6 Sec air valve vacuum port.
-Install 2 supplied Vacuum caps to the open ports on the Flap Solenoids.
-Remove small flap vacuum line from the sheathing as this will no longer be used.
***SEE PICTURES 10-13 FOR ROUTING


-Install both secondary air valves and console manifolds to the lower intake manifolds, use supplied o rings and grease. Fit with M6x22mm Hex head bolts. Torque to 6-7lb ft.
-Install supplied 997.1 Sec air supply hose to both valves.
-Install vacuum line assembly and connect to both valves if not done so.